 |
Tutorials for Moodle 1.9 |
Back Up and Restore Courses in Moodle
Dr. Richard L. Bowman
Harrisonburg, VA, USA 22802
I. Introduction
There are two main reasons that teachers have for needing or desiring
to back up their courses in Moodle.
- Create an archive of the course. Moodle makes it easy to
save all of the structure of the course in Moodle, all resources and
assignments, and all students responses and submitted materials for
possible future access.
- Assemble a new course from a previous course. When a
professor prepares to teach a course in a new semester, the course
structure, resources and assignments from a previous course may be
restored to use as beginning building blocks for the new offering.
Moodle will delete all student submitted materials and leave only
the "barebones."
These functions are accomplished from within a course in Moodle by
using the "Backup" and "Restore" functions under the "Administration"
menu on the let-hand side of the main course page. Directions for both
of these tasks are given below.(Note: These directions are
specifically for version 1.9.)
II. Archiving a Complete Course
- From the Administration menu on the main page for a particular
course in Moodle, select Backup.
- On the resulting page, leave all of the defaults as selected and
press the Continue button at the bottom of the next page. Do the
same on the next page and on the third page; note that there will be
a message near the bottom stating that the back-up was completed
successfully. Press the continue button on this page, also.
- The final page displays the directory of the new folder created
in your course file structure called "backupdata" containing
a new zipped file labeled something like: "backup-[...].zip," where
in place of [...] will be the course name
(as it appears in the
administrative database), the semester the course was offered, and
the date the backup was made.
- Finally click on the name of the zipped file (it should appear
as a link in the directory of files) and wait for the File Download
window to open. In that window
select Save to download this zipped file to your network directory
or your home computer or wherever you consider it safe to archive
your course materials. Remember that until you have saved a
copy of the backup file to a location outside of Moodle, all that has
been accomplished is that a back-up of the course has been made
within the course itself. This internal copy will be lost when the
course is removed from Moodle.
- After downloading the file, delete it from the file structure
for your course so that the backup that your technology people will make is
as small as possible. Also, if you have not already done so, it is a good idea to go to the course
"Settings" page and make the course "not available" to the students
so that it is removed from their My Moodle page thus leaving them
with only their current active courses.
III. Backing Up Only the Course Structure, Resources and Assignments
To archive only the course materials generated by the instructor
without any of the student-generated materials, follow the directions in
Section II above with the following changes in step #2.
- Deselect all of the User Data check boxes. One may clear all of
these by selecting the None option at the very top of the Include
section. Or one may clear as many of the check boxes at the top of
each each section as desired.

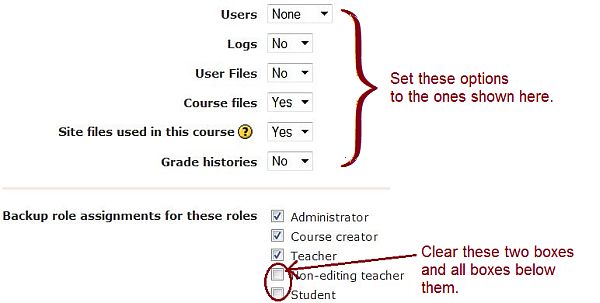
- Finally adjust the values to the parameters near the bottom of
that page as shown below. Probably the only ones that will need to
be changed is the Users and User Files, that is, these
value should be set to None and No, respectively. Also, clear all of the check boxes by the role
assignments except for the Administrator, Course creator, and
Teacher..
- Then click continue until you see the new backup
file in the course file structure. You may have to wait
a minute or so if the course has lots of material in it.
- Finally click on the name of the zipped file (it should appear
as a link in the directory of files) and wait for the File Download
window to open. In that window
select Save to download this zipped file to your network directory
or your home computer or wherever you consider it safe to archive
your course materials. After migrating to the location for saved
file but before actually pressing the last Save button,
change the name of the back-up file so that you know it
is not the full course back-up. For example, add "nostudents"
to right after the word "backup" in the file name.
- Remember that until you have saved a
copy of the backup file to a location outside of Moodle, all that has
been accomplished is that a back-up of the course has been made
within the course itself. This internal copy will be lost when the
course is removed from Moodle.
- After downloading the file, remember to delete it from the file structure
for your course so that the backup that your technology people will make is
as small as possible. Also, if you have not already done so, it is a good idea to go to the course
"Settings" page and make the course "not available" to the students
so that it is removed from their My Moodle page thus leaving them
with only their current active courses.
IV. Restoring a Complete Course (with Student Data)
- Go to the course in which you wish to do the full restore. To
prepare for the restoring, click on Settings under the
Administration menu and ascertain that the course is set to the
correct Format (either Topics or Weekly) and that the number of
weeks or topics is set appropriately.
- Return to the Administration menu and select Restore. In the
resulting directory listing upload the back-up file you saved
previously. Then select the Restore link to the far-right of the
file's name in the directory.
- Click Yes and Continue on the next two windows without making
any changes.
- On the next screen change the "Restore to" parameter to "Current course, deleting it first." Then press the Continue button
at the bottom of that page.
- On the next page select the course into which you wish to place
the restored course. And then click the "Restore this course now!"
V. Assembling a New Course from a Previously Archived Course
(without Student Data)
If you are interested in transferring only the course structure,
resources and assignments, but not the student participants nor their
submissions nor grades, then follow the above directions in Section IV
but use the file you created with only this info rather than with the
full course data.
NOTE: If you only have a file with student
data included, then you can still restore only the course structure
data. Follow the above directions replacing step 4 with the follow
instructions.
- On the next screen change the "Restore to" parameter
to "Current course, deleting it first" (this will
replace all of the existing course) or "Current course,
adding data to it." Use the last option if you
have no data in the course except for a current list of
participating students. ALSO, click the None option besides
the entry to include user data. Then press the Continue button
at the bottom of that page.
VI. Conclusion
If you inadvertently transferred some student data such as grades or
list of participants to the new course when you did not wish to do so,
use the Reset option in the Administration menu for the course and set
all of the options possible to get
rid of all of the student data. The course structure and materials
will remain, but the grades and other student items will be removed,
including the grading structure!
©2009-11; Dr. Richard L.
Bowman
Return to Ed Tech by
Bowman Home
Created and maintained by: Richard L. Bowman (
richard.bowman@edtechbybowman.net ); last updated: 5-Sep-11.